- Prerequisites
- Different ways to provision OneDrive for new users
- Why are we using both SPOnline and Graph?
- Two different approaches of doing this
- Check if your users have OneDrive provisioned
- When do you need to pre-provision OneDrive?
- Solution #1 using a CSV-file with only SPOService
- Solution #2 Provisioning for all licensed users using Microsoft Graph and SPOService.
Prerequisites
- Latest version of the SPOnline Powershell module (how to install)
- Latest version of Microsoft Graph (how to install)
- Account that has the Global adminstrator or Sharepoint administrator role
Different ways to provision OneDrive for new users
When a new user is created their OneDrive isn’t automatically created. In order for OneDrive to be provisioned one of the following thing needs to happen:
- The user signs in to OneDrive on the web by going to https://m365.cloud.microsoft/
- The user signs in to the OneDrive app on a computer or mobile device
- An administrator runs a Powershell script to pre-provision
Why are we using both SPOnline and Graph?
As many of you are aware of, Microsoft is clearly leaning towards only keeping the Microsoft Graph module as the all around tool for managing Microsoft 365 with Powershell (we saw that last year with the deprecation of the Azure AD PowerShell and MSOnline PowerShell modules). Usually when I write scripts I try to use Microsoft Graph only to make it as modern as possible, but as of today I can’t find a way to provision OneDrive using only Graph.
We still have to rely on the Request-SPOPersonalSite cmdlet which is part of the Sharepoint Online Powershell module and combine that with Graph.
I will make sure to update with a new post as soon as we can do this using Graph only!
Two different approaches of doing this
Below I will present two different solutions of doing this.
- The first solution is using a CSV-file to have complete control of which users you are provisioning OneDrive for. This is based only on the SPOnline module.
- The second solution gets all users that don’t have OneDrive provisioned and provisions it for them. This solution uses both Microsoft Graph and the SPOnline module.
Check if your users have OneDrive provisioned
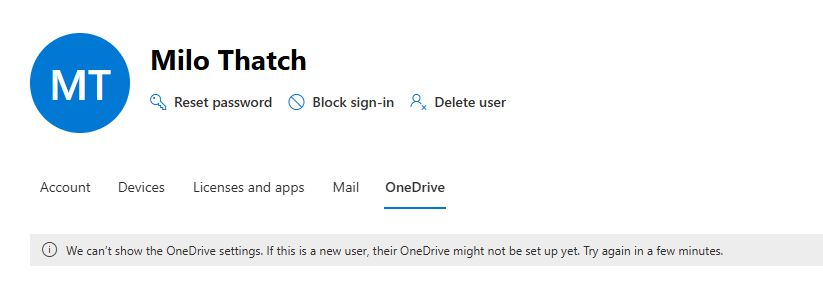
If you want to check OneDrive for a user you can do that in the Microsoft 365 admin portal by selecting Users > Active Users > Click on your user and open the OneDrive tab. As we can see here OneDrive for Milo Thatch isn’t provisioned yet which tells us he hasn’t signed in yet. 👇
When do you need to pre-provision OneDrive?
The most common scenario I can think of when pre-provisioning is necessary is when doing tenant to tenant migrations. Usually what you’ll do is create a bunch of users in bulk in the destination tenant. In order to start moving data to their OneDrive’s they need to be provisioned in order for that to work.
Solution #1 using a CSV-file with only SPOService
#RUNS IN POWERSHELL 5.1!

# Import the SharePoint Online module
Import-Module Microsoft.Online.SharePoint.PowerShell

# Connect to SharePoint Online (make sure URL is correct and uses https://)
Connect-SPOService -Url "https://yourtenant-admin.sharepoint.com/"

# Import the user list from CSV
$users = Import-Csv -Path ".\users.csv"

# Loop through each user to provision OneDrive
foreach ($user in $users) {
    try {
        $upn = $user.UserPrincipalName
        Write-Host "Provisioning OneDrive for $upn..."

        # Pre-provision OneDrive
        Request-SPOPersonalSite -UserEmails $upn -NoWait

        Write-Host "Provisioning requested for $upn" -ForegroundColor Green
    }
    catch {
        Write-Host "Failed to provision OneDrive for $upn. Error: $_" -ForegroundColor Red
    }
}Code language: PowerShell (powershell)
The CSV is just a one column file like this (maximum of 199 rows per CSV):
userPrincipalName
milothatch@tob-it.seCode language: CSS (css)
Open Powershell 5.1 and navigate to the folder where your script and your users.csv is located and run the script. This is the output you will see (don’t worry about the yellow warning if you see it):

If we wait a few minutes and the go back to the admin portal we can see that Milo’s OneDrive is now provisioned!

Solution #2 Provisioning for all licensed users using Microsoft Graph and SPOService.
If you prefer to just press the big red button (which is pretty nice sometimes, not gonna lie) you can provision OneDrive for ALL users that don’t have it. Below is the full script followed by an explaination of what’s actually happening. This works in Powershell 7 if you are using VS Code like me (don’t ask me why, it just does 😂):
param(
    [Parameter(Mandatory = $true)]
    [string]$SharepointURL
)

# Import the SharePoint Online module
Import-Module Microsoft.Online.SharePoint.PowerShell

# Connect to Graph & SharePoint
Connect-MgGraph -Scopes "User.Read.All" -NoWelcome
Connect-SPOService -Url $SharepointURL

$batch = @()

# Get all active licensed users
Get-MgUser -All -Property UserPrincipalName,AssignedLicenses,UserType,AccountEnabled |
    Where-Object {
        $_.AssignedLicenses.Count -gt 0 -and
        $_.UserType -eq 'Member' -and
        $_.AccountEnabled -eq $true
    } |
    Sort-Object UserPrincipalName |
    Where-Object {
        -not (Get-SPOSite -IncludePersonalSite $true -Filter "Owner -eq '$($_.UserPrincipalName)'" -ErrorAction SilentlyContinue)
    } |
    ForEach-Object {
        Write-Host "Provisioning OneDrive for $($_.UserPrincipalName)..."
        $batch += $_.UserPrincipalName
        if ($batch.Count -ge 199) {
            Write-Host "Provisioning OneDrive for batch:" -ForegroundColor Cyan
            $batch | ForEach-Object { Write-Host " - $_" }
            Request-SPOPersonalSite -UserEmails $batch -NoWait
            $batch = @()
            Start-Sleep -Milliseconds 500
        }
    }

# Process remaining batch that didn't fill the 199 quota
if ($batch) {
    Write-Host "Provisioning OneDrive for final batch:" -ForegroundColor Cyan
    $batch | ForEach-Object { Write-Host " - $_" }
    Request-SPOPersonalSite -UserEmails $batch -NoWait
}

Write-Host "Completed OneDrive Pre-Provisioning." -ForegroundColor GreenCode language: PowerShell (powershell)
When you first run the script you have to provide your Sharepoint admin URL (if you’re not sure what it is just go to Sharepoint admin center and copy the URL there, it’s in the format https://yourtenant-admin.sharepoint.com) and then sign in to both Graph and the SPO service.
This script uses Get-MgUser to get all users from Entra ID and provisions OneDrive for based on the following criteria:
- The account is enabled
- The account is not a guest account
- The user has a license assigned
After we get all users that follow the criterias above, the script checks if they have OneDrive enabled by using 👇
(Get-SPOSite -IncludePersonalSite $true -Filter "Owner -eq '$($_.UserPrincipalName)'"Code language: PowerShell (powershell)👆This row above basically checks if they have a personal site (which is the backend name for OneDrive). It checks if the owner of that personal site matches the UPN that we got with Get-MgUser. If it’s not a match (the user doesn’t have OneDrive provisioned) the script will add that user to a batch. Each batch is a maximum of 199 users (this is due to a limitation in the Request-SPOPersonalSite cmdlet where it caps on 200 users). After each batch it rests for 0,5 seconds before it goes on to the next batch.
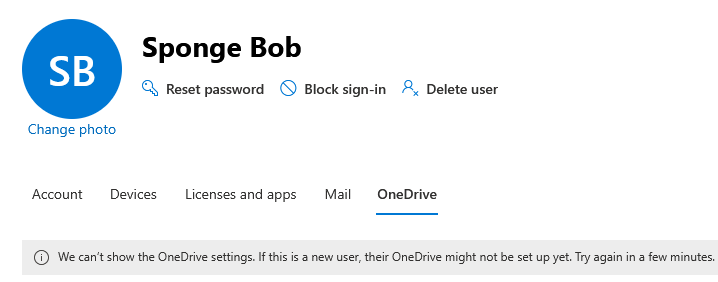
Here is Sponge Bob’s OneDrive before running the script:
When running the script this is the output we get (I only have one license in my tenant that was assigned to Mr.Sponge so that’s why he is the only user getting provisioned):

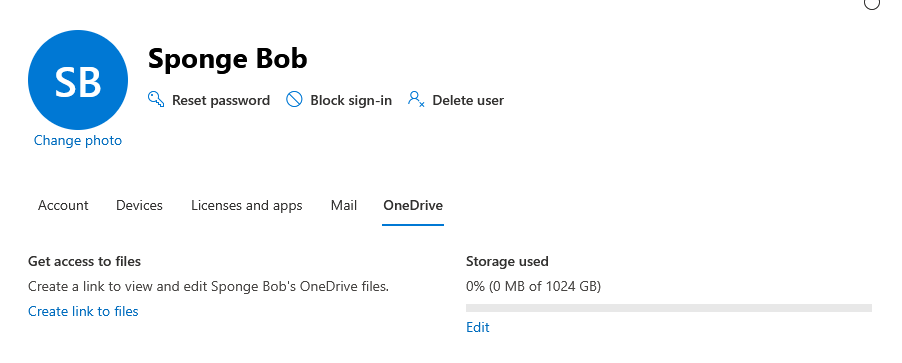
A few minutes later Mr.Sponge was all set🥳
That’s all for today. Thanks for reading and I really hope this helped you out. Consider subscribing to get notified whenever I post. You can do that in the popup or by leaving a comment below and checking the box to subscribe.
Leave a Reply